
Looking to boost your PC’s speed and performance? Installing an SSD (Solid State Drive) is one of the smartest upgrades you can make.
But if you’re not sure where to start or worried about messing up, you’re in the right place. This guide will walk you through every step, from opening your case to setting up your new drive, using simple instructions you can easily follow.
By the end, you’ll know exactly how to install an SSD in your PC and enjoy faster load times, quicker file transfers, and a smoother computing experience. Ready to transform your setup? Let’s dive in!
Choosing The Right Ssd
Choosing the right SSD is a key step in upgrading your PC. It affects speed, storage, and overall performance. Picking the best drive means understanding the types, brands, and compatibility with your system.
Types Of Ssds
There are several SSD types to consider. SATA SSDs use a traditional data cable and offer good speed. NVMe SSDs connect directly to the motherboard and provide faster performance. M.2 SSDs are small and fit into a compact slot on the motherboard. Choose the type that fits your needs and budget.
Best Ssd Brands
Some brands are known for reliability and quality. Samsung, Crucial, Western Digital, and Kingston often receive high marks. These brands offer good warranties and customer support. Selecting a trusted brand helps ensure long-lasting storage and consistent speed.
Compatibility With Your Pc
Check your PC’s motherboard for supported SSD types. Look for SATA ports or M.2 slots. Confirm the maximum SSD size your system can handle. Also, verify your operating system supports the SSD. This avoids installation issues and ensures smooth operation.
Preparing For Installation
Preparing your PC before installing an SSD is important. It ensures safety and smooth installation. Taking the right steps helps avoid errors and data loss.
Start by gathering all necessary tools and materials. Then back up your important data. Finally, power down and unplug your PC carefully.
Gathering Tools And Materials
Collect the tools needed for SSD installation. A screwdriver is usually required. Have the SSD drive ready. Also, check for any mounting brackets or screws. Keep cables nearby, like SATA and power cables if needed. Organizing tools first saves time during installation.
Backing Up Your Data
Backing up data protects your files from loss. Use an external hard drive or cloud storage. Copy all important documents, photos, and programs. This step is crucial if you plan to replace your main drive. It prevents losing anything valuable during the installation process.
Powering Down And Unplugging
Turn off your PC completely before starting. Shut down through the operating system. Then unplug the power cable from the wall outlet. Disconnect all other cables like monitor, keyboard, and mouse. This avoids electric shock and hardware damage. Wait a few minutes to let the PC fully power down.
Installing The Ssd Physically
Installing the SSD physically in your PC is a simple process. It involves opening the case, finding the right slot, and connecting the cables. Each step must be done carefully to avoid damage. Follow the instructions below to fit the SSD into your computer safely.
Opening The Pc Case
Turn off your PC and unplug all cables. Place the computer on a flat surface. Use a screwdriver to remove the screws holding the side panel. Slide the panel off gently and set it aside. Now, you have access to the inside of your PC.
Locating The Ssd Slot
Look for the SSD slot on the motherboard or drive bay. Most modern PCs have M.2 slots or 2.5-inch drive bays. The M.2 slot is usually near the CPU, while the 2.5-inch bay is inside the case. Check your motherboard manual if you are unsure.
Removing Heat Sinks If Needed
Some SSDs or slots have heat sinks attached. Unscrew or unclip these carefully. Remove any protective plastic film from the thermal pads. Keep the heat sink nearby to reattach after installing the SSD.
Securing The Ssd In Place
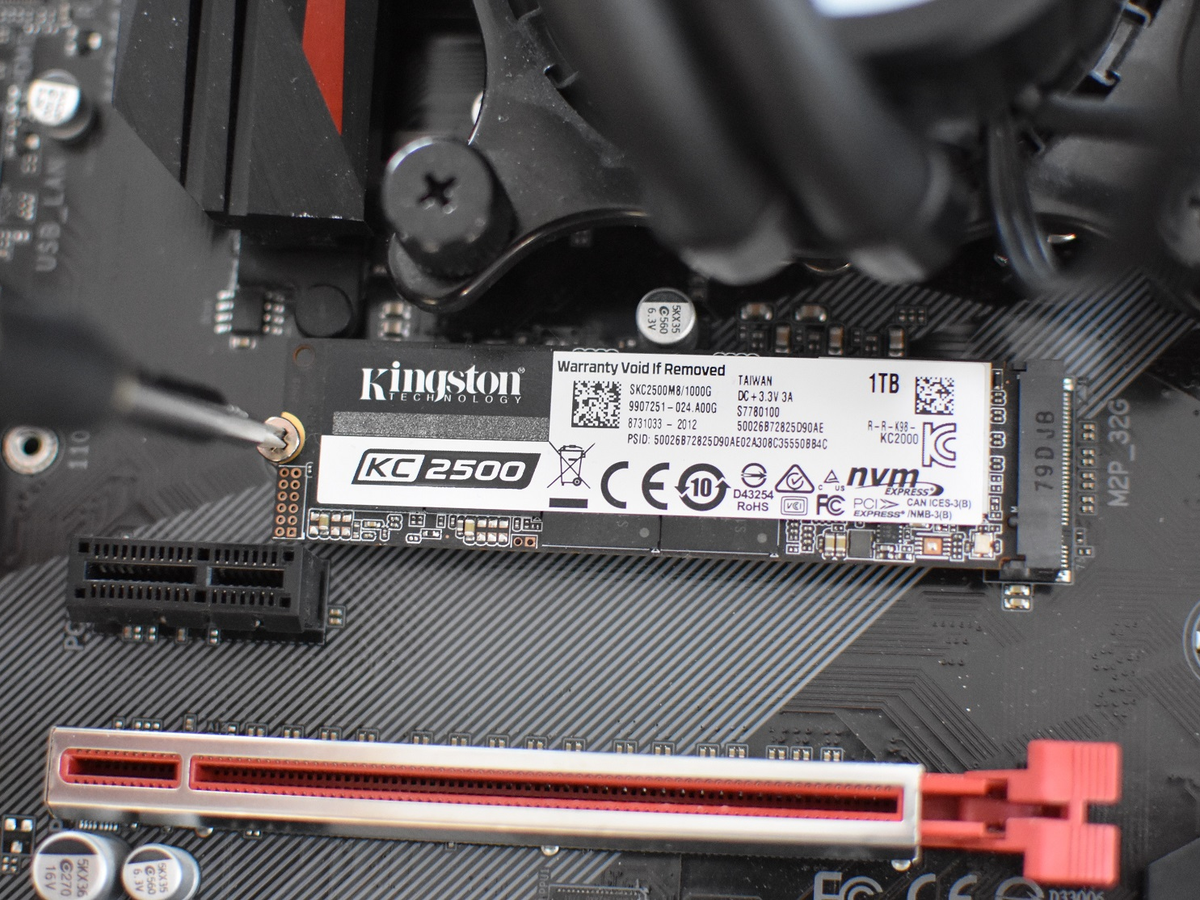
For M.2 SSDs, insert the drive at a 30-degree angle into the slot. Press it down gently and secure it with a small screw. For 2.5-inch SSDs, slide the drive into the drive bay. Use screws or brackets to hold it firmly in place.
Connecting Power And Data Cables
Connect the SATA data cable from the SSD to the motherboard. Attach the SATA power cable from the power supply to the SSD. For M.2 SSDs, no cables are needed as they connect directly to the motherboard. Double-check all connections before closing the case.

Credit: www.avantserveis.com
Setting Up The Ssd In Windows
After physically installing the SSD into your PC, setting it up in Windows is essential. This process prepares the new drive for use. Windows needs to recognize the SSD before you can store files on it. Follow these clear steps to get your SSD ready.
Accessing Disk Management
First, open Disk Management. Press Windows + X keys on your keyboard. From the menu, select Disk Management. This tool shows all connected drives on your PC. Look for your new SSD here. It may show as Disk 1 or another number, marked as Unallocated.
Initializing The Ssd
Before use, the SSD must be initialized. Right-click the new SSD in Disk Management. Choose Initialize Disk. A window will appear asking for the partition style. Select GPT (GUID Partition Table) for modern systems. Click OK to start initialization. This step prepares the drive for formatting.
Creating A New Simple Volume
Next, create a new volume on the SSD. Right-click the unallocated space on the SSD. Select New Simple Volume. The New Simple Volume Wizard will open. Click Next to continue. Choose the volume size, or leave it as default. Assign a drive letter to the SSD, then click Next.
Formatting The Ssd
Format the SSD to make it usable. In the wizard, select NTFS as the file system. Set the allocation unit size to default. You can also name the volume in the Volume label box. Check the box for Perform a quick format. Click Next, then Finish. The SSD will now format and be ready for use.
Optimizing Ssd Performance
Optimizing your SSD performance is essential to keep your PC running fast and smooth. After installing the SSD, some settings help maintain its speed and lifespan. These tweaks ensure your SSD works efficiently without unnecessary wear. Follow the simple steps below to optimize your SSD for the best results.
Enabling Trim
TRIM allows your SSD to manage unused data blocks. This helps the drive know which space is free. It prevents slowdowns caused by leftover data. To enable TRIM on Windows, open Command Prompt as administrator. Type fsutil behavior set DisableDeleteNotify 0 and press Enter. This command turns TRIM on, improving your SSD’s speed and lifespan.
Disabling Disk Defragmentation
Defragmentation is good for traditional hard drives but harms SSDs. It causes extra wear without improving performance. Windows usually detects SSDs and disables defragmentation automatically. Still, check by searching “Defragment and Optimize Drives” in the Start menu. Select your SSD and click “Change settings.” Make sure defragmentation is off for your SSD.
Setting Ssd As Boot Drive
For the fastest start-up, set your SSD as the boot drive. Restart your PC and enter BIOS by pressing a key like F2 or Delete. Find the boot order menu and move your SSD to the top. Save changes and exit BIOS. Your PC will now load Windows from the SSD, reducing boot time significantly.

Credit: www.youtube.com
Troubleshooting Common Issues
Troubleshooting common issues during SSD installation helps avoid frustration and saves time. Some problems may stop your SSD from working correctly. Knowing how to fix these issues makes the process smoother. Below are solutions to frequent problems users face when installing an SSD in their PC.
Ssd Not Detected
Sometimes the PC does not recognize the SSD after installation. First, check if the SSD is properly connected to the motherboard and power supply. Loose cables often cause detection problems. Next, enter the BIOS or UEFI settings and see if the SSD appears in the storage devices list. Enable any disabled ports if needed. Also, update the motherboard firmware to improve compatibility. If the SSD still does not show, try connecting it to another SATA port or use a different cable. In some cases, the SSD might be faulty and require replacement.
Slow Performance
Slow SSD speeds can reduce overall PC performance. Confirm the SSD is connected to the correct SATA port supporting the fastest speed, usually SATA III. Using an older SATA II port lowers transfer rates. Check that the SSD uses the AHCI mode in BIOS, which improves speed and stability. Running outdated or missing drivers can also slow down the SSD. Download and install the latest drivers from the SSD manufacturer’s website. Avoid filling the SSD to its full capacity, as this decreases speed. Regularly update your operating system for better SSD support.
Error Messages During Setup
Error messages during SSD setup may confuse new users. Common errors include “Disk not initialized” or “Drive not formatted.” Open the Disk Management tool in Windows to initialize the SSD. Choose GPT or MBR partition style based on your system requirements. Create a new simple volume and format it using the NTFS file system. Sometimes, antivirus software or security settings block the setup process. Temporarily disable such software during installation. If errors persist, check for firmware updates for the SSD, which can fix bugs and improve compatibility.
Credit: www.veneklinikken.dk
Frequently Asked Questions
How Do I Install An Ssd In My Pc?
Power off your PC and unplug all cables. Open the case and insert the SSD into the correct slot. Secure it with screws or latches. Connect SATA data and power cables. Close the case, power on, then format and initialize the SSD via Disk Management in Windows.
Can I Just Plug A New Ssd In?
You cannot just plug in a new SSD and use it immediately. You must connect power and data cables, then format the drive in your PC’s Disk Management. This process ensures the SSD works properly and appears on your system.
Can I Install Ssd By Myself?
Yes, you can install an SSD yourself by powering off your PC, connecting the drive properly, and formatting it in Disk Management.
Which Company Ssd Is Best?
Samsung, Western Digital, Crucial, and Kingston offer some of the best SSDs. Choose based on speed, durability, and price.
Conclusion
Installing an SSD in your PC is simpler than it seems. Take your time and follow each step carefully. Make sure all connections are secure before powering on. After installation, format the SSD so your computer recognizes it. Enjoy faster boot times and improved overall performance.
Upgrading your PC with an SSD is a smart choice. Keep this guide handy for future reference or troubleshooting. Your computer will thank you with quicker, smoother operation.
