
You’ve got important voice messages saved on your iPhone, but now you want to keep them safe on your PC. Maybe it’s a special memory, a work note, or something you need to share easily.
Whatever the reason, transferring those voice messages doesn’t have to be confusing or time-consuming. In this guide, you’ll learn simple, step-by-step ways to save your iPhone voice messages directly to your computer. By the end, you’ll have peace of mind knowing your audio files are backed up and ready whenever you need them.
Ready to get started? Let’s dive in!

Credit: www.youtube.com
Prepare Your Iphone For Transfer
Before transferring voice messages from your iPhone to your PC, you must prepare your device. This preparation ensures a smooth and successful transfer process. Taking a few simple steps can prevent interruptions or errors during the transfer.
Preparation also helps keep your voice messages safe and accessible. Follow these steps to get your iPhone ready for transfer.
Check Storage And Battery
Ensure your iPhone has enough storage space for the voice messages you want to save. Go to Settings > General > iPhone Storage to check available space. Delete unnecessary files or apps to free up space.
Charge your iPhone battery to at least 50% before starting the transfer. A low battery can cause the process to stop unexpectedly. Keep your device connected to a power source during the transfer for best results.
Update Ios For Compatibility
Make sure your iPhone runs the latest version of iOS. Updates improve device performance and fix bugs. They also enhance compatibility with your PC and transfer software.
Open Settings > General > Software Update to check for updates. Download and install any available updates before starting the transfer. This step helps avoid software conflicts and transfer failures.

Credit: www.wikihow.com
Use Itunes To Save Voice Messages
Saving iPhone voice messages to your PC using iTunes is a practical choice. It keeps your recordings safe and easy to access. The process involves connecting your iPhone, backing up your voice memos, and finding them on your computer. This method does not require extra apps or complex steps. Follow the simple guide below to save your voice messages quickly.
Connect Iphone To Pc
Use a USB cable to connect your iPhone to your PC. Open iTunes on your computer. Make sure iTunes detects your device. If this is your first time connecting, tap “Trust” on your iPhone screen. This allows the PC to access your iPhone data. Keep the connection stable throughout the process.
Backup Voice Memos With Itunes
In iTunes, click the iPhone icon at the top left. Go to the “Summary” tab. Select “This Computer” under the backup section. Click “Back Up Now” to start the backup. This saves all your iPhone data, including voice memos. Wait for the backup to finish before disconnecting your iPhone.
Locate Voice Memos On Your Computer
Find the backup files on your PC. They are usually stored in the “Apple” folder within your user directory. Voice memos are inside the backup, but hidden in system files. Use third-party software to extract voice memos easily. Alternatively, restore the backup on another iOS device to access the memos. This method keeps your recordings organized and secure.
Transfer Voice Messages Via Icloud
Transferring voice messages via iCloud offers a simple way to save your iPhone voice memos to a PC. This method uses Apple’s cloud service to keep your recordings synced across devices. You can access and download your voice memos without needing cables or complex software.
Follow these steps to enable syncing, access your memos on PC, and download them locally. This process ensures your voice messages stay safe and easy to retrieve anytime.
Enable Voice Memos Sync On Iphone
Open the Settings app on your iPhone. Tap your Apple ID name at the top of the screen. Select iCloud from the list. Scroll down and find Voice Memos. Turn on the toggle next to it.
This setting uploads your voice memos to iCloud automatically. Your recordings will sync with other devices using the same Apple ID. Make sure your iPhone is connected to Wi-Fi during this process.
Access Voice Memos On Pc Through Icloud
On your PC, open a web browser and visit iCloud.com. Log in with your Apple ID and password. Click on the Voice Memos app icon.
All synced voice memos will appear here. You can play recordings directly from the browser. This lets you listen to your files without downloading them first.
Download Files Locally
To save voice memos on your PC, select the recording you want. Click the Download button, usually shown as a cloud icon with an arrow. Choose a folder on your PC to save the file.
The voice memos will download as M4A files. You can move, edit, or play them with any compatible audio player. This method keeps your recordings backed up and ready for offline use.
Share Voice Memos Using Email Or Messaging
Sharing voice memos via email or messaging apps offers a quick way to save iPhone voice messages to your PC. This method lets you send audio files directly from your iPhone. You can then download these files on your computer without needing special software or cables.
This process works well for short voice memos. It is easy to complete and does not require complex steps. Follow the simple instructions below to share your voice memos.
Select Voice Memo To Share
Open the Voice Memos app on your iPhone. Browse through your list of recordings. Tap the voice memo you want to send. You will see options to play, edit, or share the file. Tap the Share button, usually shown as a square with an arrow pointing up. This action opens a menu with sharing options.
Send Via Email Or Messaging Apps
In the sharing menu, choose the Email or a messaging app like Messages or WhatsApp. Enter the recipient’s email address or phone number. Add a message if you want. Then, tap Send. The voice memo will attach as an audio file. The recipient, which can be your own email or phone, will receive the file shortly.
Save Attachments On Pc
Open your email or messaging app on your PC. Locate the message with the voice memo attachment. Click the attachment to download it. Choose a folder on your PC to save the file. Now, you can play or move the voice memo as needed. This method keeps your voice memos safe and easy to find.
Use Third-party Software Solutions
Saving iPhone voice messages to a PC can be tricky without the right tools. Third-party software solutions offer a simple way to transfer these files quickly. These apps connect your iPhone to your computer and help move voice messages easily. They often provide extra features like file management and backup options.
Explore Popular Transfer Tools
Several reliable apps help transfer iPhone voice messages to PC. iMazing is well-known for its user-friendly interface and strong transfer capabilities. Another popular choice is AnyTrans, which supports many file types. Dr.Fone offers a variety of phone management tools, including voice message transfer. These tools work with both Windows and Mac computers.
Step-by-step Transfer Process
Start by downloading and installing the software on your PC. Connect your iPhone using a USB cable. Open the app and select the voice messages or voice memos section. Choose the files you want to save and click the export or transfer button. Pick a folder on your PC to save the files. Wait for the transfer to finish before disconnecting your device.
Pros And Cons Of Third-party Apps
These apps make file transfer fast and easy. You can move multiple voice messages in one go. They also offer backup and restore features. Some apps support other iPhone data types, adding value. On the downside, many apps require a paid license for full features. Some may ask for permissions that feel intrusive. A few tools might have a learning curve for beginners.
Manage And Organize Saved Voice Messages
Managing and organizing saved voice messages on your PC helps keep your files easy to find and use. Proper management prevents clutter and saves time when searching for specific recordings. This section explains simple ways to organize, backup, and secure your voice messages effectively.
Rename And Categorize Files
Rename voice message files with clear, descriptive names. Use dates, topics, or event names to identify each file quickly. Create folders for different categories like work, personal, or interviews. This system helps you find messages without opening each file. Consistent naming and categorizing make your voice messages easy to manage.
Backup To External Drives
Save copies of your voice messages on external drives like USB flash drives or external hard disks. Backups protect your files from accidental deletion or computer failure. Schedule regular backups to keep your files up-to-date. Using external drives also frees space on your PC for other important data.
Keep Files Secure And Accessible
Protect voice message files with passwords or encryption tools. Secure files prevent unauthorized access and keep your information private. Store files in folders with restricted permissions. Ensure easy access by organizing files logically and keeping backup copies. A secure, well-organized system balances safety with convenience.
Troubleshoot Common Transfer Issues
Transferring iPhone voice messages to a PC can sometimes face common issues. These issues can block smooth transfer or cause files not to appear. Knowing how to fix these problems saves time and frustration. This section helps solve frequent problems quickly and easily.
Fix Connection Problems
Check the USB cable for damage or loose connections. Use an original or certified Apple cable for better results. Try plugging the cable into a different USB port on your PC. Restart both your iPhone and computer before trying again. Disable any security software that might block the connection. Make sure your iPhone is unlocked and trusts the connected PC.
Resolve Sync Failures
Update iTunes or your syncing software to the latest version. Confirm your iPhone has enough free space for syncing voice messages. Turn off iCloud sync for voice memos temporarily to avoid conflicts. Reset sync settings by disconnecting and reconnecting your device. Check if your PC’s operating system needs updates for better compatibility.
Handle Unsupported File Formats
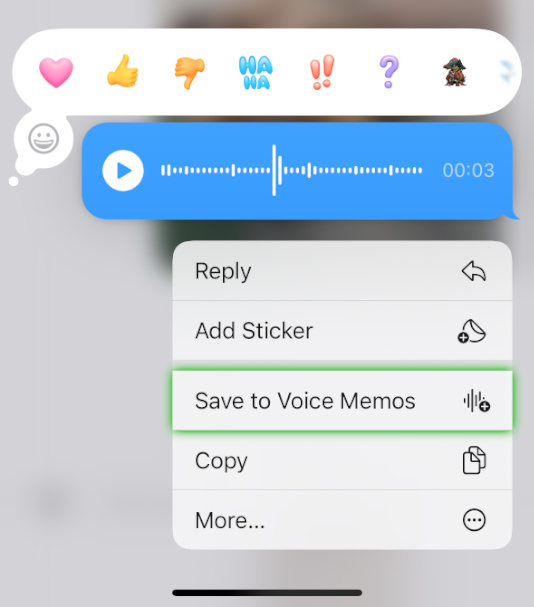
Voice memos usually save in M4A format, supported by most players. Some apps might not recognize this format, causing playback or transfer errors. Convert voice memos to MP3 or WAV files using free conversion tools. Use trusted software to avoid losing audio quality. Check the file extension carefully before transfer to ensure compatibility.
Credit: www.wideanglesoftware.com
Frequently Asked Questions
How To Save Iphone Voice Messages To Computer?
Open Voice Memos on iPhone, select the message, tap the three dots, then choose Share. Send it via email or save to Files, then access it on your computer. Alternatively, sync voice memos with iCloud and download them from iCloud.
com to your PC.
How To Transfer Iphone Voice Notes To Pc?
Open the Voice Memos app on your iPhone. Select a memo, tap the three dots, then choose “Share. ” Send it via email or save to iCloud Drive. Access the file on your PC and download it. Alternatively, sync voice memos with iCloud to transfer them automatically.
How To Export Audio From Iphone To Pc?
Open Voice Memos on iPhone, select the recording, tap Share, choose email or cloud storage. Access and download it on your PC. Alternatively, sync via iCloud or use iTunes to transfer audio files directly.
How Do I Export Voice Recordings From My Iphone?
Open the Voice Memos app, select a recording, tap the three dots, then choose Share. Select email, AirDrop, or save to Files to export.
Conclusion
Saving iPhone voice messages to your PC keeps your memories safe. Use simple methods like iCloud, email, or iTunes for easy transfer. Regularly backing up helps avoid losing important files. Choose the way that fits you best. Now, your voice messages can stay with you anytime, anywhere.
